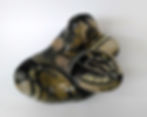
Figure 1: The last in the series done
This figure was the first to start this series of three but turned out to be the last to finish. Thus, this figure informed the making process of the others while profiting from what I learnt from the other two during their the later finishing stages. In the end, I think I like this, Figure 1, the best. Anyway, for the sake of consistency and continuity I'd better continue describing the making process from where I left off.
After the design liners were set during a second bisque firing I masked out area which I intended to leave unglazed by painting on liquid wax resist. I made sure that the areas on which the figures sits on the shelf were left unglazed. To make sure that I got the correct areas I sat it on a wet paper cloth and circled the areas which got wet. This way I knew I areas left unglazed were exact.

As I spent so much time tidying up the glaze on the wax resist areas on Figure2 I decided not to spray glaze this figure but to pour the glaze. Based on some previous test I chose to apply a celadon glaze instead of a clear glaze.

This method of pouring the glaze actually was the easiest and worked the best even though I didn't manage to cover whole figure in one go. The foot by which I was holding it had be glazed in a second glaze pouring. Pouring ensured that the wax areas didn't get covered up and there was only a very little glaze beading to be cleaned off the waxed areas. I also didn't have many drips to scrape down.

Now the figure went into a gas kiln and got fired to about 1275°c in reduction. I am very pleased with how it looked after firing. Of course there are still little imperfections and things I could improve upon such as:

1.
Make super, super sure that the areas that touch the kiln shelf are clear of glaze. Maybe I need to put latex resist on and remove this just before putting out for glaze firing.
Here I used a diamond polishing pad to remove as much of the white residue left from contact with the glaze shelf. Unfortunately it also removed a bit of the black slip. It just doesn't look quite as neat as I would like it.

2.
I had what seemed like a black finger mark on this unglazed section. I decided to sand it back. This was a bad idea as, even if the glaze is unglazed, it may change colour via some of the fumes in glaze affecting its surface. I should have thought of this and just let it be.


3. Have an awareness of how different design liners interact with different glazes. Here the black and white have bubbled up a bit and fused with the celadon glaze. These may react differently with different celadon glazes which are made from different ingredients.
But as said, overall I am very please with this figure: